Types of OBD 9 PIN
The OBD 9pin connector is a standardized interface that connects diagnostic tools to the vehicle's onboard computer. The 9-pin connector is less common than the 16-pin OBD-II connectors. However, it is still used in some vehicles and older truck diagnostic ports. Here are some types of OBD 9-pin connectors.
- DB9 Connector: This is a 9-pin D-subminiature connector commonly used for serial communication. In the context of OBD, a DB9 connector might be used in some older vehicles or specific truck models for diagnostic communication. However, it is not a standard OBD-II connector but rather an adapter for connecting to a vehicle's diagnostic port.
- ISO 9141-2: This is an International Organization for Standardization (ISO) standard for automotive diagnostic communication over a single wire. It defines the electrical characteristics and communication protocols for on-board diagnostics. ISO 9141-2 is used in some OBD 9-pin connectors for low-speed communication with the vehicle's ECU (Engine Control Unit).
- SAE J1850: This is a Society of Automotive Engineers standard for on-board diagnostic communications. It specifies the electrical characteristics and protocol for vehicles communicating with diagnostic tools. The OBD 9-pin connectors have two variants of the SAE J1850 standard: PWM (Pulse Width Modulation) and VPW (Variable Pulse Width). Cars with J1850 connectors from American manufacturers use them mainly.
- CAN (Controller Area Network): This is a robust vehicle bus standard designed for automotive applications. It allows microcontrollers and devices to communicate with each other without a host computer. The OBD 9-pin connectors use the CAN protocol for high-speed communication with the vehicle's ECUs. The CAN protocol is widely used in modern vehicles for real-time diagnostics and programming.
Specification and maintenance of OBD 9PIN
The specifications of the OBD2 9 PIN connector are as follows:
-
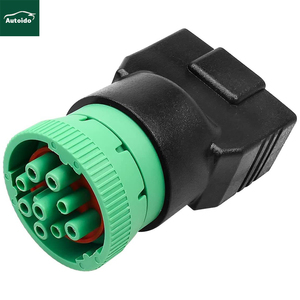
Plug
The OBD 9PIN plug is utilized for connecting to diagnostic tools and other external devices. It consists of 9 pins, each designated for specific functions, such as communication, power supply, and ground connections.A.
-
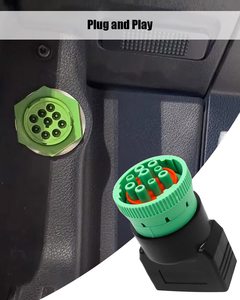
Socket
The OBD 9PIN socket is employed for linking to the vehicle's onboard diagnostic system. It mirrors the plug's pin arrangement, facilitating a direct connection to the vehicle's diagnostic system.
-
Pin assignment
The pin assignment of the OBD 9PIN connector is as follows:
1. Communication line: Used for data exchange between the diagnostic tool and the vehicle's ECU.
2. Power supply: Provides power to the diagnostic tool from the vehicle.
3. Ground: Establishes a ground connection between the diagnostic tool and the vehicle.
4. Reserved: Not utilized in the OBD 9PIN connector.
5. Communication line: Functions as a backup for data exchange.
6. ECU identification: Used to identify the connected ECU.
7. Private: Reserved for specific functions or future expansions.
8. Power supply: A second power line for supplying power to the diagnostic tool.
9. Signal ground: A ground connection for signals.
Maintaining the OBD 9PIN connector is crucial to sustaining its performance and durability. The following tips may assist in achieving this:
-
Regular cleaning
Regularly clean the OBD 9PIN connector to eliminate dust, dirt, and moisture. A soft, dry cloth or a mild cleaner can be utilized when cleaning.
-
Avoid moisture
Avoid exposing the OBD 9PIN connector to moisture or liquids, as this may damage its internal components. If it becomes wet, promptly dry it with a clean cloth.
-
Avoid physical damage
Protect the OBD 9PIN connector from physical damage, such as drops or impacts. Use a protective cover or case to prevent it from being damaged.
-
Regular inspection
Periodically inspect the OBD 9PIN connector to identify any signs of damage or wear. If any problems are detected, promptly address them to prevent further deterioration.
-
Compatible cable
Use a suitable diagnostic tool cable to prevent pin damage or connector wear. Avoid using damaged or worn cables, as they may affect the OBD 9PIN connector's performance.
How to Choose OBD 9pin
Choosing the right OBD-II 9-pin connectors and cables requires considering several factors:
-
Know the Vehicle
To know the make, model, and year of the vehicle one wants to connect to the OBD-II 9-pin interface. This is important as some older vehicles may require additional adapters or have different pin configurations.
-
Connector Compatibility
Not all OBD-II connectors are compatible with every vehicle. Check which connector style is supported by the vehicle's OBD-II port. The most common styles are the 16-pin rectangular, 9-pin circular, and 6-pin triangular connectors.
-
Quality of Cables and Adapters
Invest in high-quality OBD-II cables and adapters from reputable brands. Cheap clones or knockoffs may not work reliably and could damage the OBD port over time due to poor fitment.
-
Scan Tool Compatibility
Make sure the scan tool or diagnostic tool one plans to use is compatible with the OBD-II 9-pin connector being purchased. Check the user manual for supported connectors.
-
Functionality
Different OBD-II 9-pin connectors offer varying levels of functionality such as reading/clearing codes, live data streams, etc. Choose one that meets the diagnostic needs.
-
Budget
Set a budget but do not compromise on quality. A good OBD-II 9-pin connector can save money in the long run by accurately diagnosing and potentially fixing issues without going to a mechanic.
-
Warranty and Support
Check if the OBD-II 9-pin connector comes with a warranty and what type of customer support is available. This can be helpful in case of any issues or questions regarding use.
How to DIY and Replace OBD 9PIN
Here is a guide on how to replace the OBD 9 pin connector
-
Safety Precautions
Before working on a vehicle's electrical system, ensure there is no power drain on the battery. Make sure to double check that the vehicle's battery is disconnected before starting work. When working with the vehicle's electrical system, exercise caution to avoid shocking oneself or damaging the circuits.
-
Gather the Necessary Tools and Materials
Make sure to have the new OBD 9pin connector, a soldering iron, solder, wire cutters, crimping tool, electrical tape, and a multimeter before starting work on the OBD 9pin connector.
-
Identify the Pins and Their Functions
Before removing the old connector, take a picture or make a diagram of the pin connections. This will ensure that the new connector is wired the same way as the old one. The pins on the OBD 9pin connector are usually numbered on the connector and have the following functions:
- Pin 1: Chassis Ground
- Pin 2: Bus +
- Pin 3: Bus -
- Pin 4: K-Line (Diagnostic Line)
- Pin 5: L-Line (Not used in most cases)
- Pin 6: User Defined
- Pin 7: Reserved
- Pin 8: +12V Power Supply
- Pin 9: Wake-Up (Used to wake up the ECU when needed)
Remove the Old Connector
Carefully cut the wires going to the old connector. Be careful not to cut the wrong wires. Then, use a small screwdriver or similar tool to loosen the screws holding the connector in place and take it out.
Connect the New OBD 9 Pin Connector
Connect each wire to the corresponding pin on the new connector. Refer to the diagram or picture taken earlier to ensure correct wiring. The colors of the wires may not match the standard colors, so be careful.
Solder the Connections
Once the wires are in place, use a soldering iron and solder to make sure the connections are secure. This will help the connector work better and last longer. If the connections are loose, the connector may not work right.
Test the New Connector
Before reassembling everything, test the new connector with a multimeter. This ensures that the connections are right. Check continuity between each pin and its corresponding wire to make sure there are no breaks in the circuit.
Reassemble and Test
Once the connector has been tested, carefully wrap the wires with electrical tape to prevent short circuits. Reattach any covers or panels that were removed and reconnect the vehicle's battery. Start the vehicle and test the OBD II scanner to make sure it works properly.
Q and A
Q1: What does the 9-pin OBD connector do?
A1: The 9-pin OBD connector is an interface that allows communication between a vehicle's onboard diagnostic system and external devices, such as diagnostic scan tools or computers. It enables access to diagnostic information, emissions data, and other real-time parameters, facilitating vehicle diagnostics and troubleshooting.
Q2: Which cars use the 9-pin OBD connector?
A2: The 9-pin OBD connector is primarily used in many cars and light trucks. However, some older vehicles may not have it. Check the vehicle's manual or consult the manufacturer to determine if the car has an OBD-II port.
Q3: Where is the 9-pin OBD connector usually located in a vehicle?
A3: The 9-pin OBD connector is typically located inside the driver's cabin, usually within a foot or two of the driver's side. It may be found under the dashboard, close to the steering column or near the center console. If it is not visible, it may be necessary to remove a cover panel or look in other nearby locations.
Q4: Can the 9-pin OBD connector be used for software updates?
A4: Yes, the 9-pin OBD connector can be used for software updates in many cases. Manufacturers provide access to their diagnostic tools and update procedures through this interface. Vehicle-specific software updates can be performed using compatible diagnostic equipment connected to the OBD-II port.
Q5: Are all 9-pin OBD connectors the same, or are there variations?
A5: While the physical layout of the 9-pin OBD connectors is standardized, there may be variations in the quality and functionality of different cables and adapters. It is essential to use OBD-II connectors and accessories that comply with the industry standards to ensure compatibility and reliable performance.


 浙公网安备 33010002000092号
 浙B2-20120091-4